Follow the below instructions to forward e-signed documents to the document forwarding email address:
Note: This only applies to fully e-signed documents. Manually or partially e-signed documents will need to be forwarded as per Step 6.
Step 1. Make changes to your settings to apply this feature
Set up your document forwarding email address
This is required to ensure the document forwarding email address is automatically applied to the ‘Forward Documentation’ section of the Collaboration Page and for the fully e-signed documents to be forwarded to this email address.
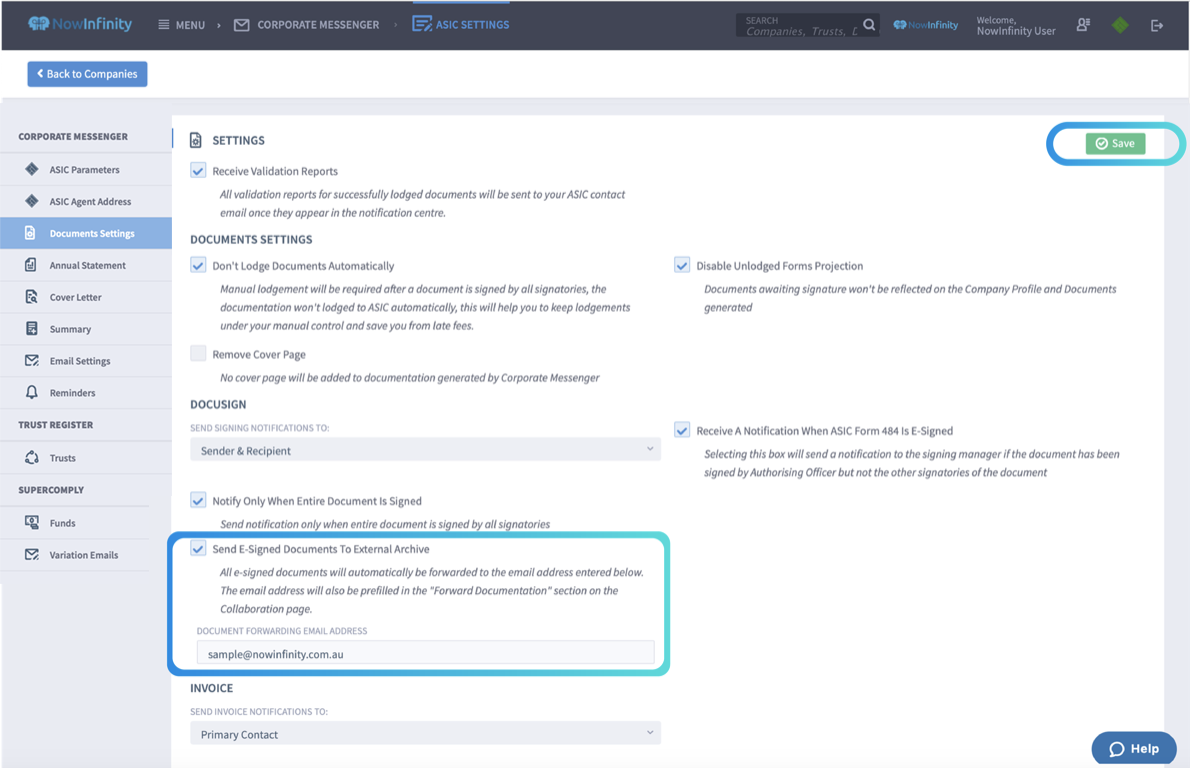
Go to Menu > Corporate Messenger - Product Settings > Document Settings
Tick ‘Send E-Signed Documents To External Archive’, enter the ‘Document Forwarding Email Address’ and click the ‘Save’ button.
Set up your Document Reference code in your ‘Forward Documents’ email template (Optional)
The Document Reference code is applied to the ‘Forward Documents’ email template when sending the documents via the ‘Forward Documentation’ section of the Collaboration Page. The Document Reference is used as an extra communication tool when sending the documents to your forwarding inbox via the document forwarding email address (in Document Settings) to pick up on the Document Reference (if configured in your external system).
E.g. If you would like to ensure the e-signed documents are automatically forwarded to the document forwarding email address, you will need to ensure the email address or forwarding inbox is configured to read the received email and validate the Document Reference code.
Note: the configuration of how the document forwarding email address will read information from the Forward Documents email is not the responsibility of NowInfinity. The process will end at the automatic sending of the e-signed documents.
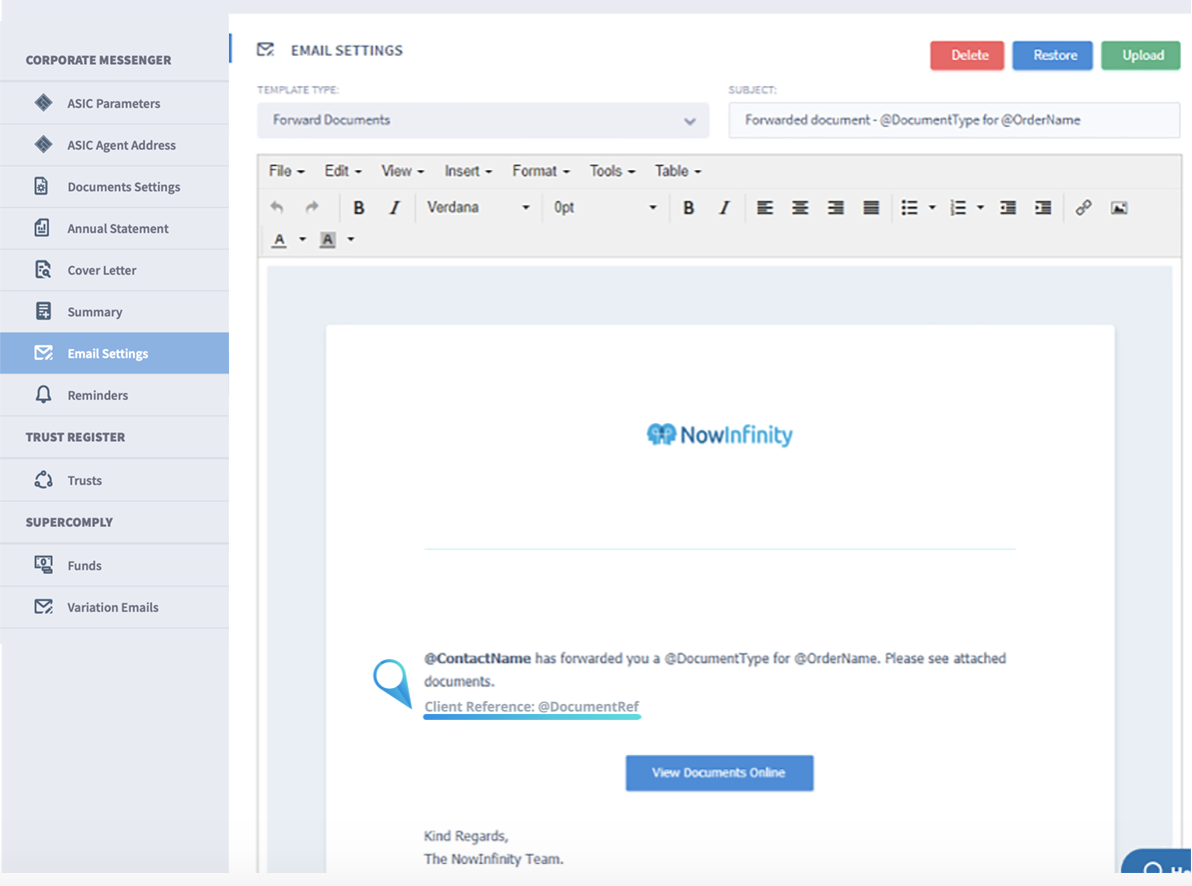
Go to Menu > Corporate Messenger – Product Settings > Email Settings
For Template Type, from the dropdown list choose ‘Forward Documents’.
On the email template, apply the code ‘@DocumentRef’ and click ‘Upload’ to save changes.
E.g. Client Reference: @DocumentRef
Set up your Summary Report to include ‘Number of Documents Sent To Archive’ (Optional)
If you would like to see how many e-signed documents were sent to your forwarding inbox on your daily/weekly/monthly Summary Report.
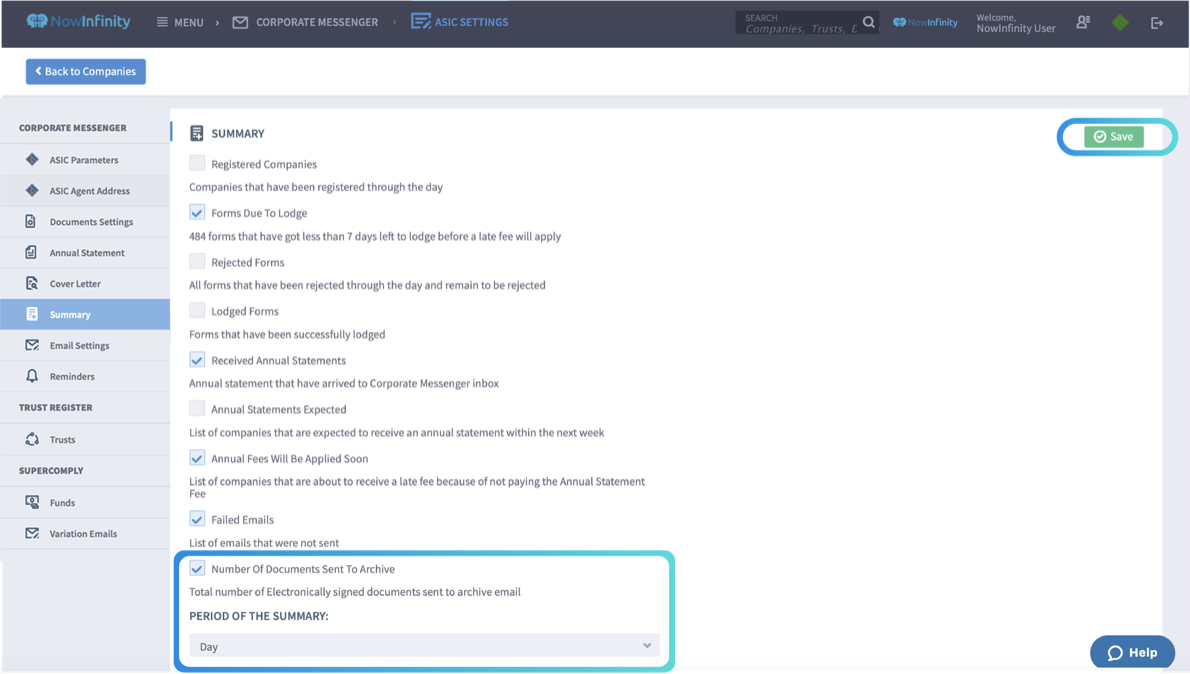
Go to Menu > Corporate Messenger – Product Settings > Summary
Tick ‘Number of Documents Sent To Archive’ and any other summaries you would like to be sent. Ensure a ‘Period of the Summary’ is selected and click ‘Save’.
Step 2. Ensure all companies and trusts have the ’Reference’ filled in (Optional)
NOTE: Disregard this step if you did not set up your Document Reference code in the ‘Forward Documents’ email template in Step 1.
To set up the reference in Company Profiles:
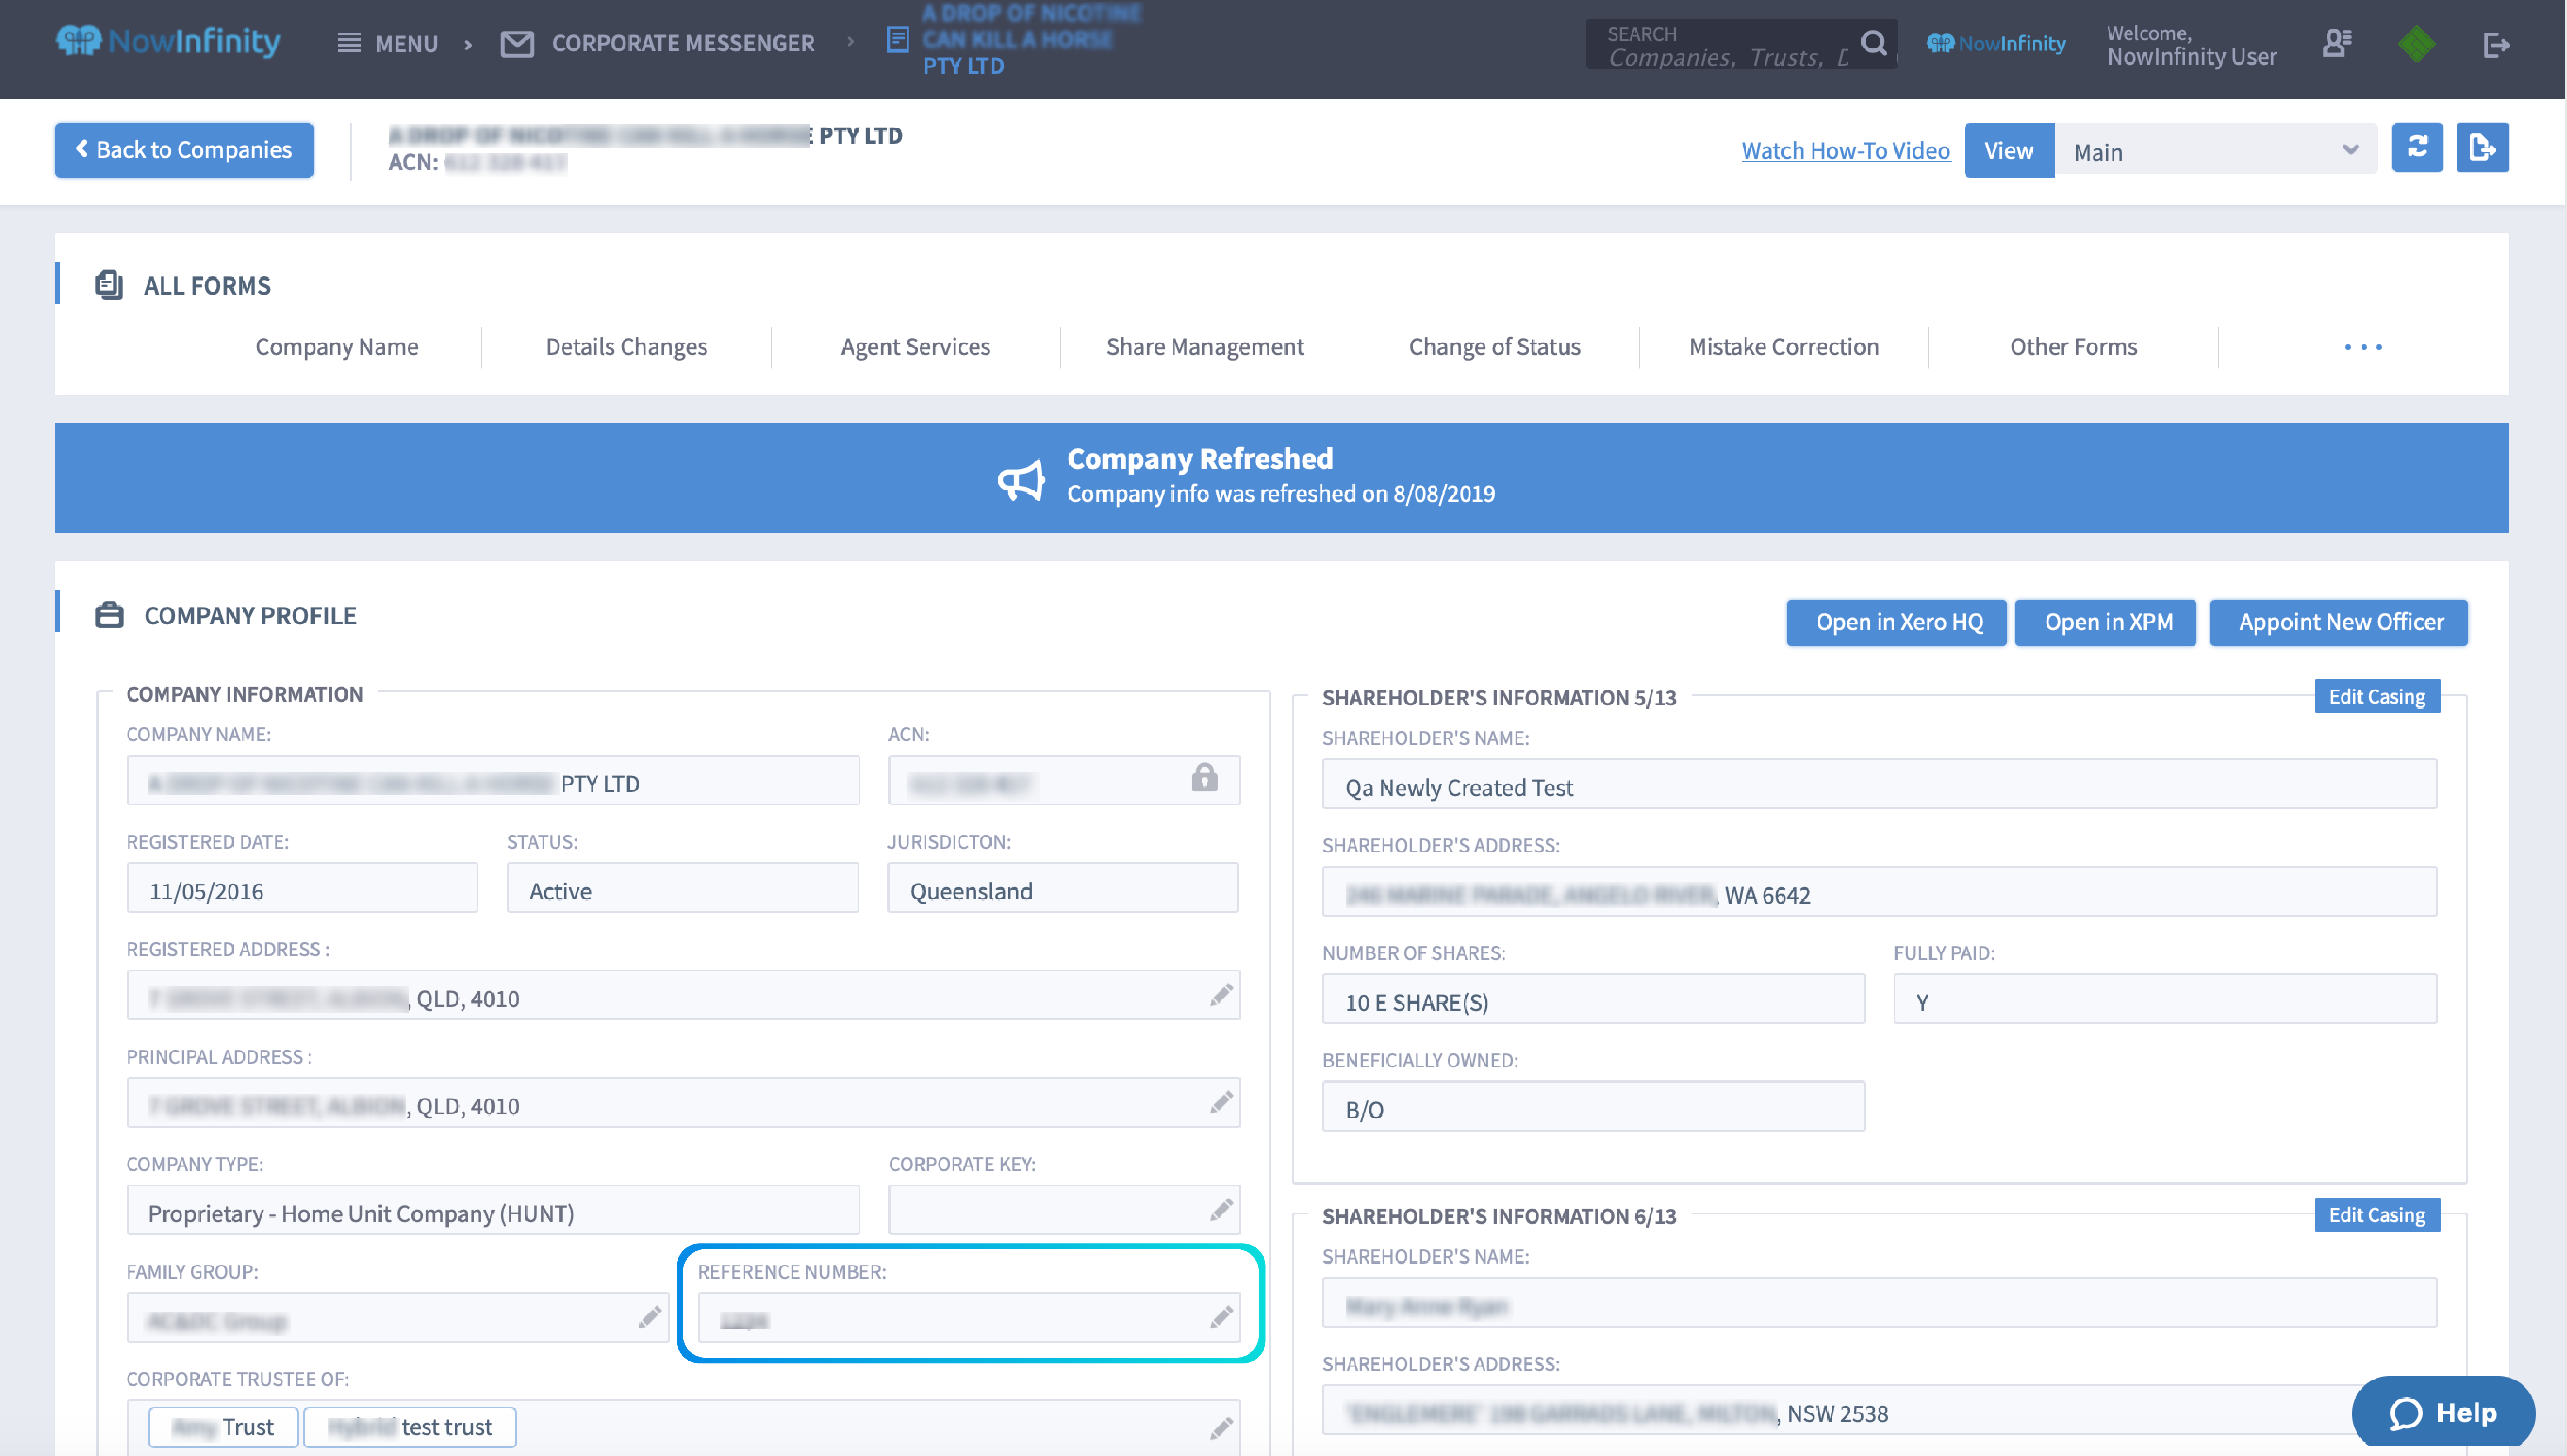
Go to Menu > Corporate Messenger – Companies > Click ‘See full profile’ icon of the relevant company.
In the Company Information section, in the ‘Reference Number’ box, click the pencil icon.
Enter the Reference code and click the tick icon to save.
Note: The symbols “>” and “<” will not be accepted.
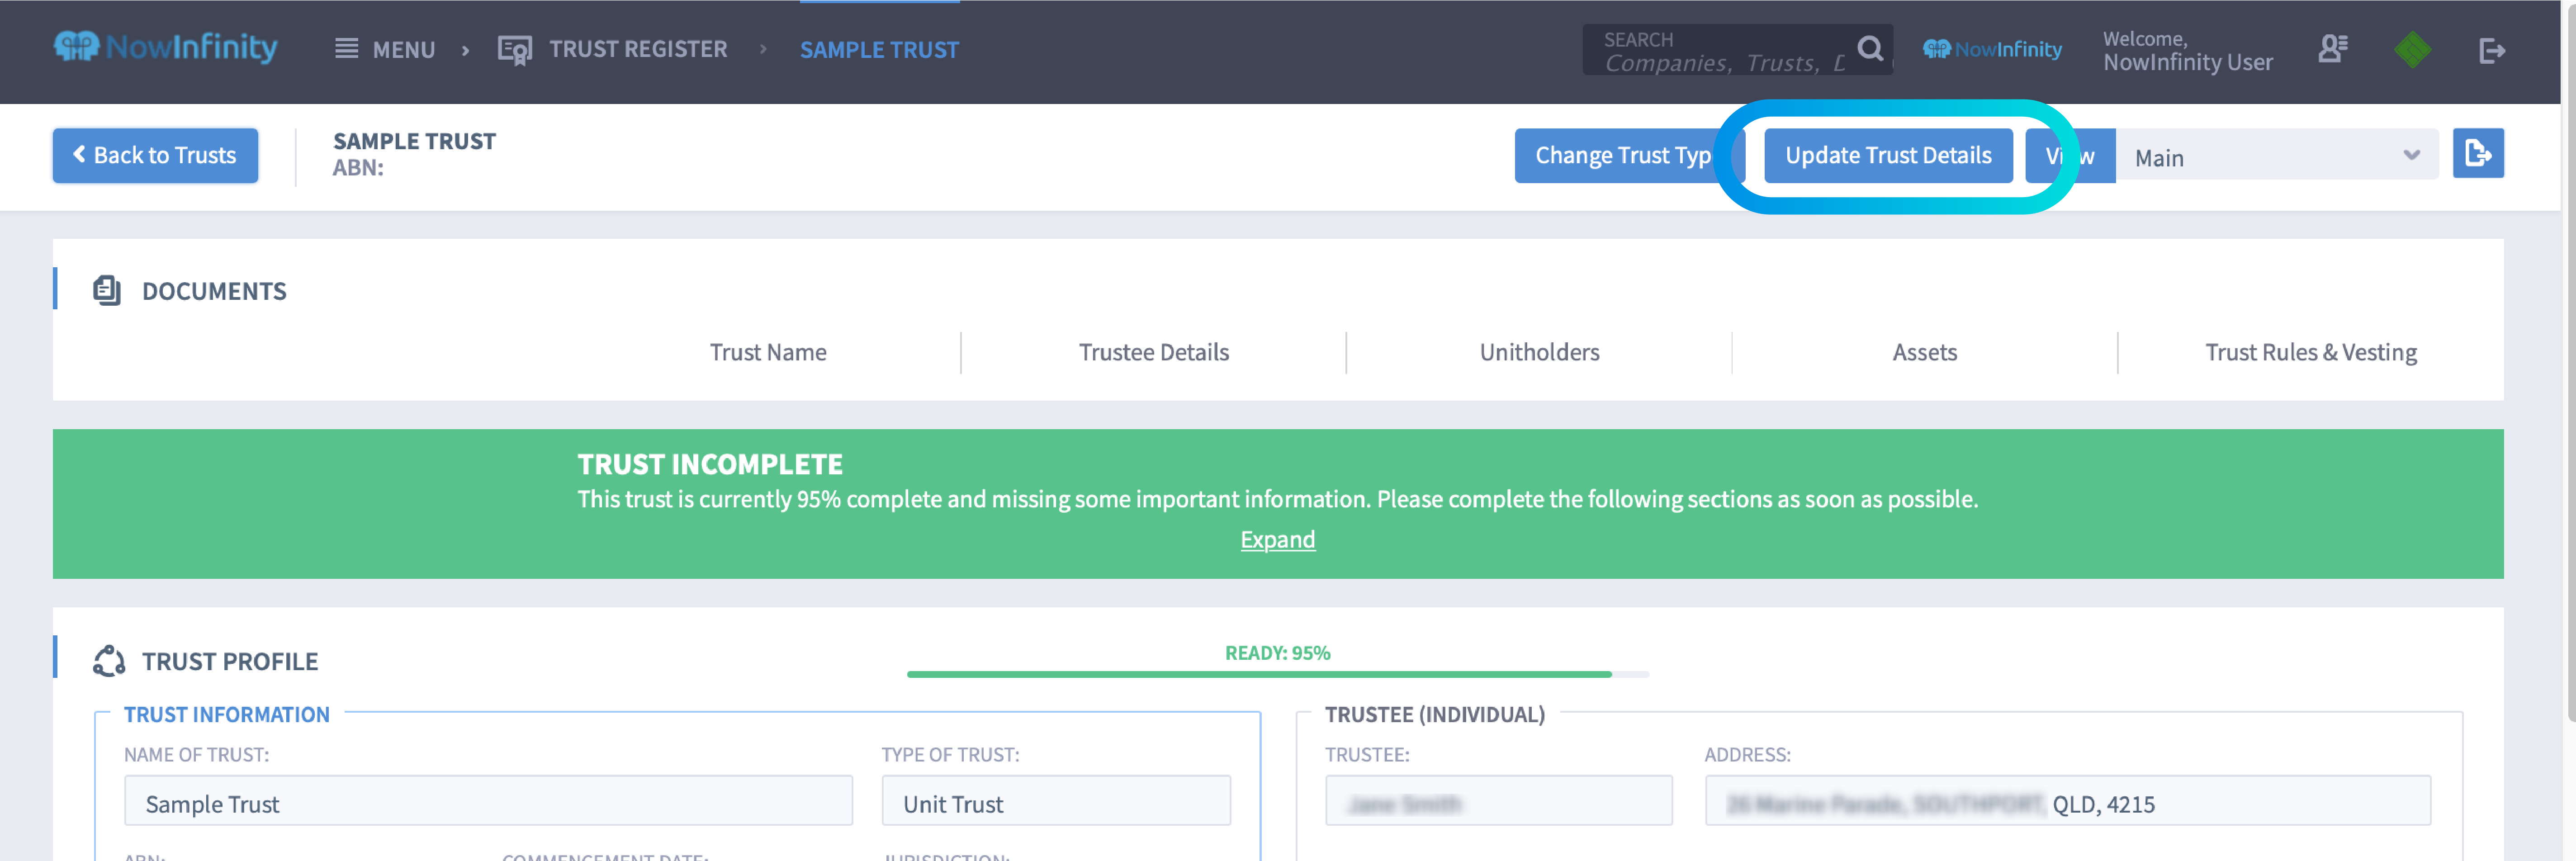
To set up the reference in Trust Profiles:
Go to Menu > Trust Register – Trusts > Click ‘See full profile’ icon of the relevant company.
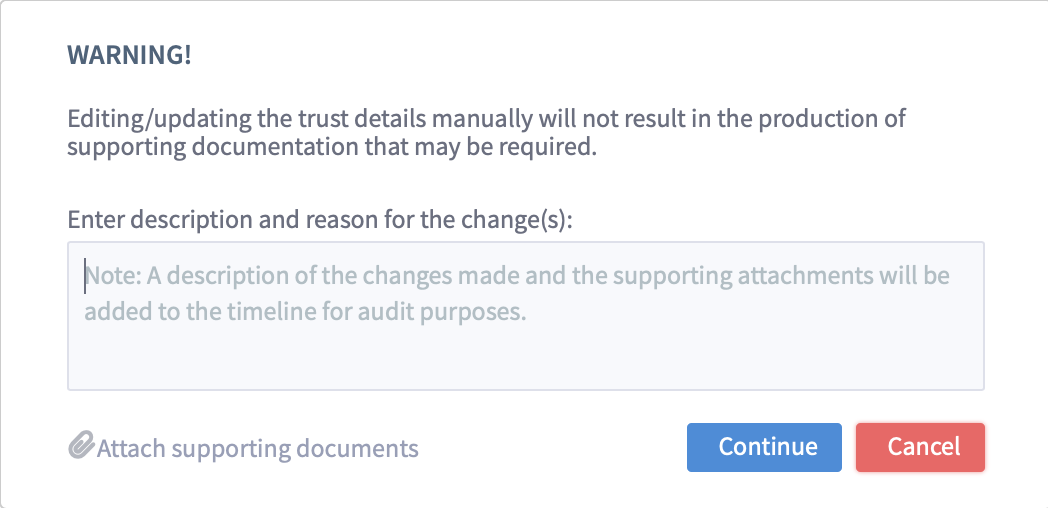
At the top of the page, click ‘Update Trust Details’. A warning pop-up will appear requesting a description of the changes that will be made to the trust profile. Type in ‘Reference code’ and/or any other details you may be changing and click ‘Continue’. This will allow you to edit sections of the Trust Profile.
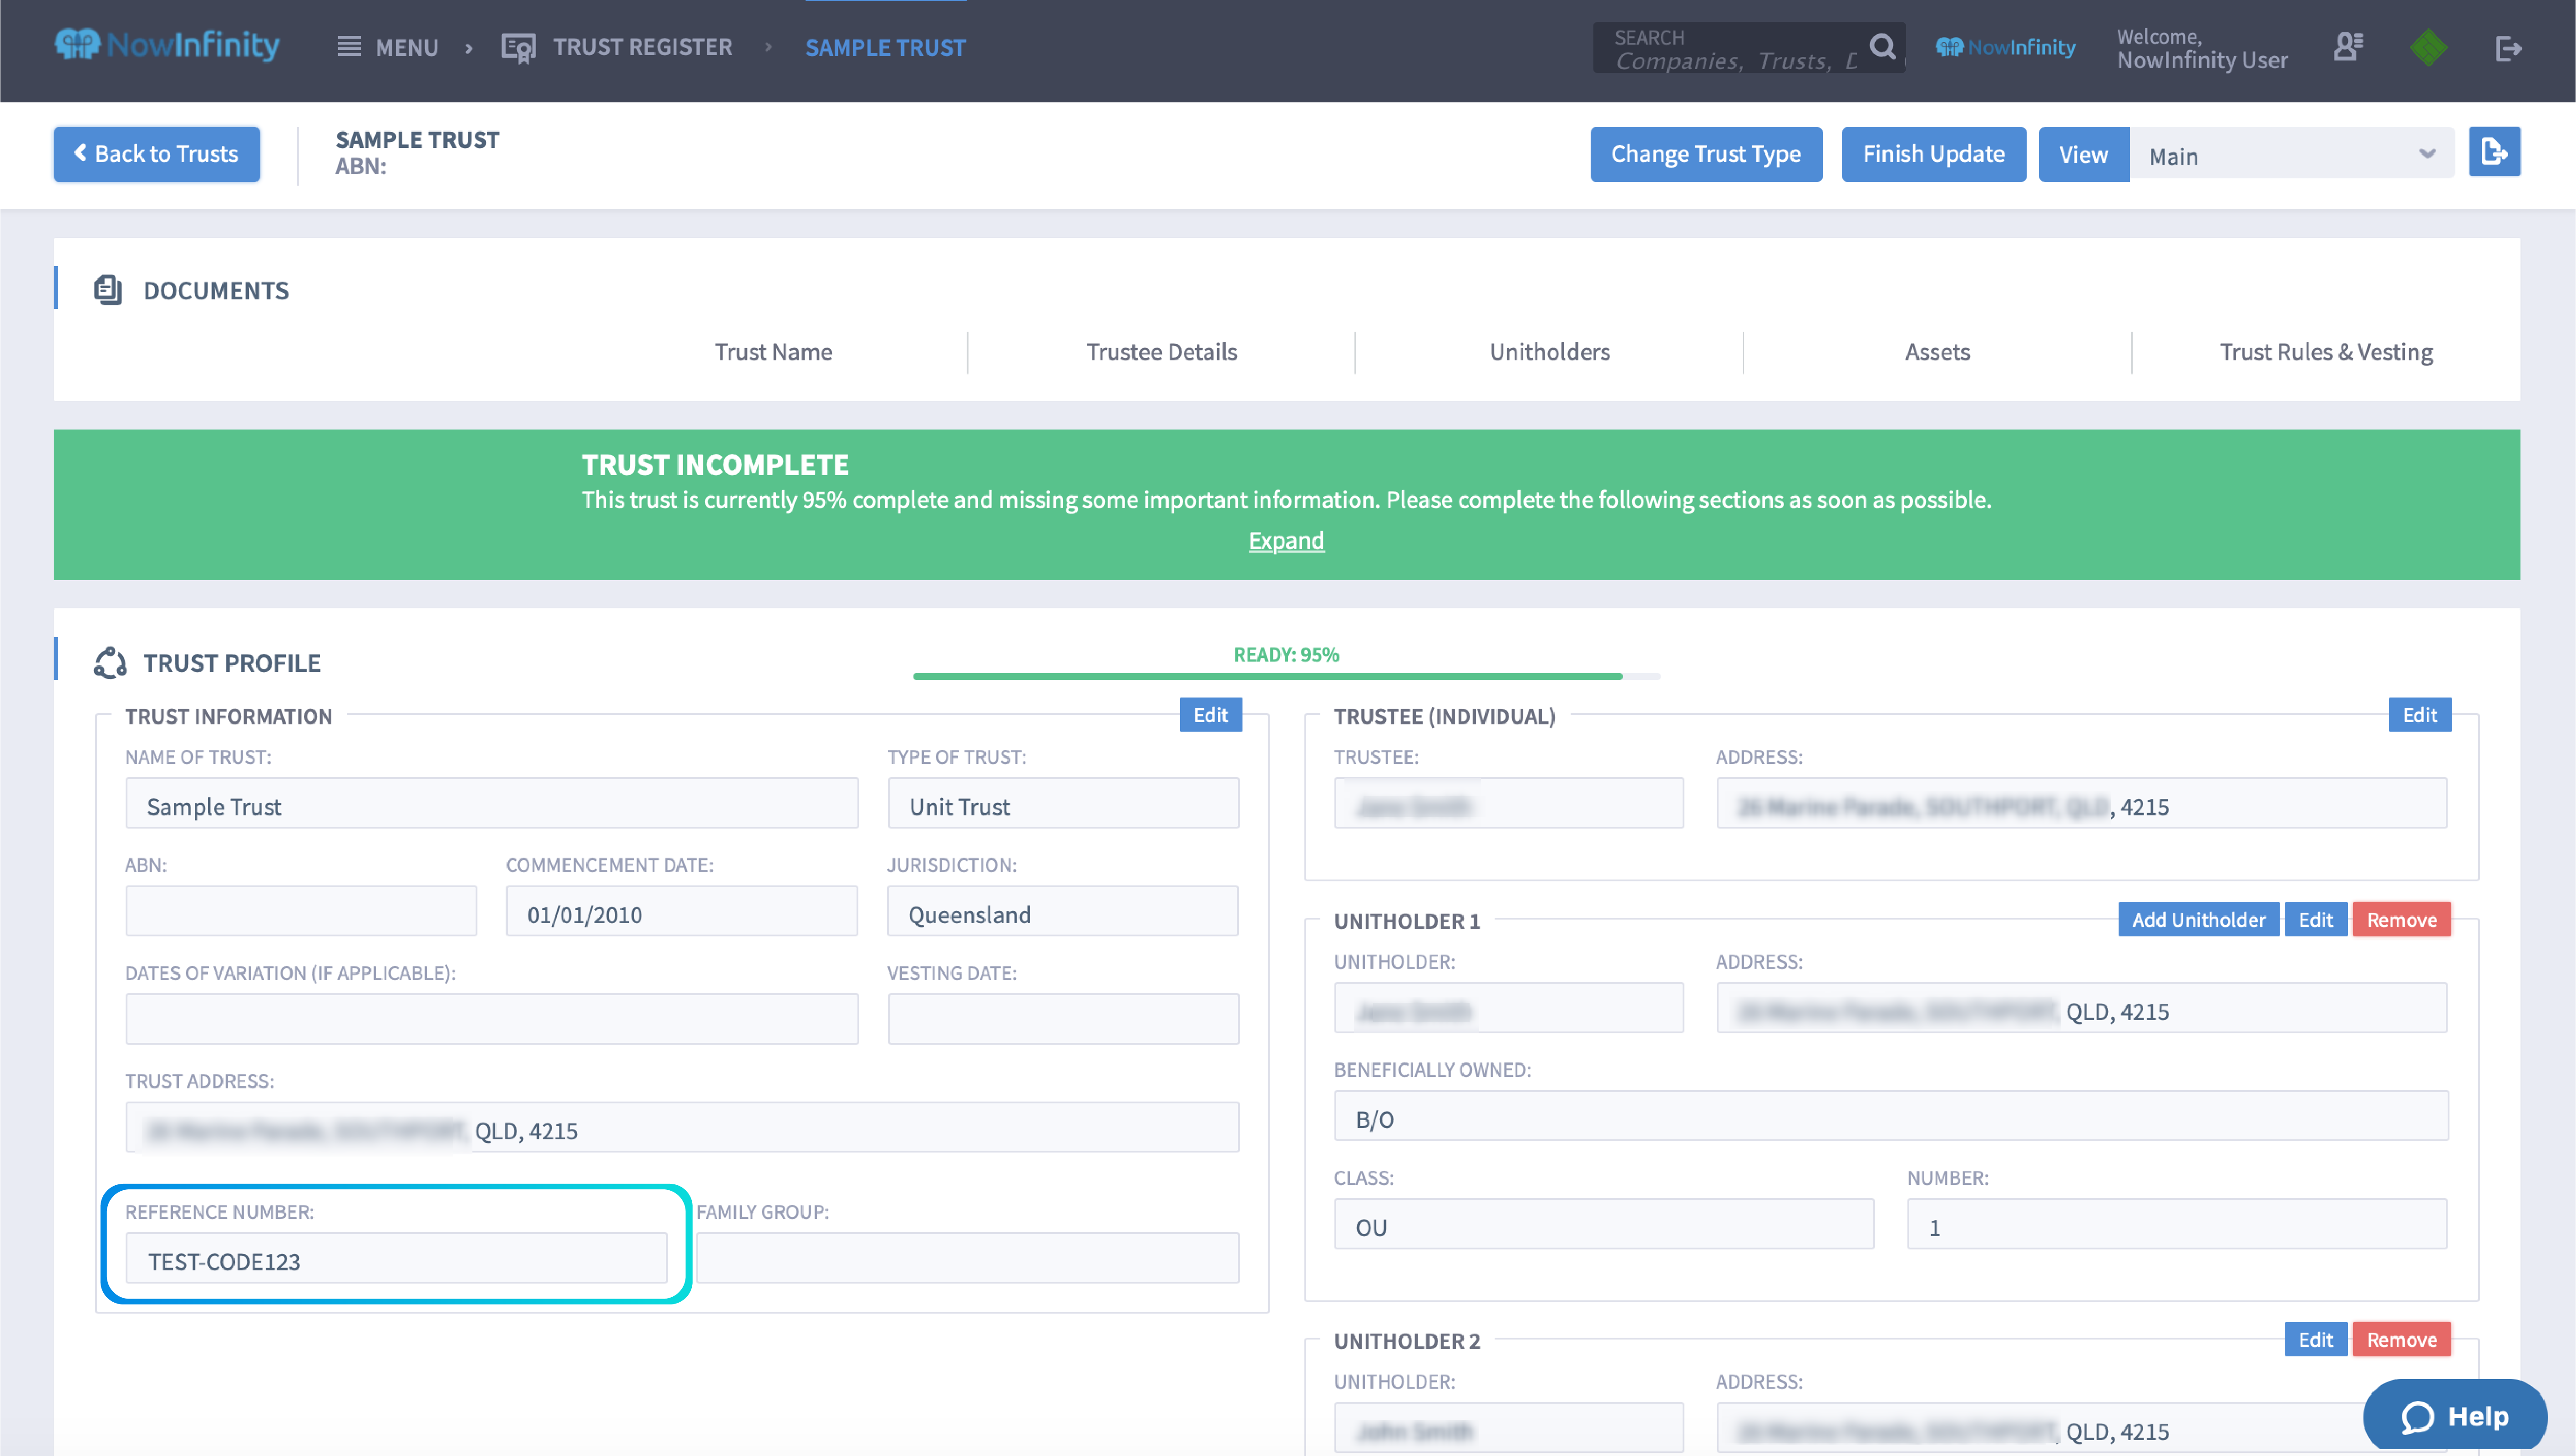
In the Trust Information section, click the ‘Edit’ button and enter the Reference code in the ‘Reference Number’ box and click the ‘Save’ button. Click 'Finish Update' at the top right of the page to close the edit function.
NOTE: The symbols “>” and “<” will not be accepted.
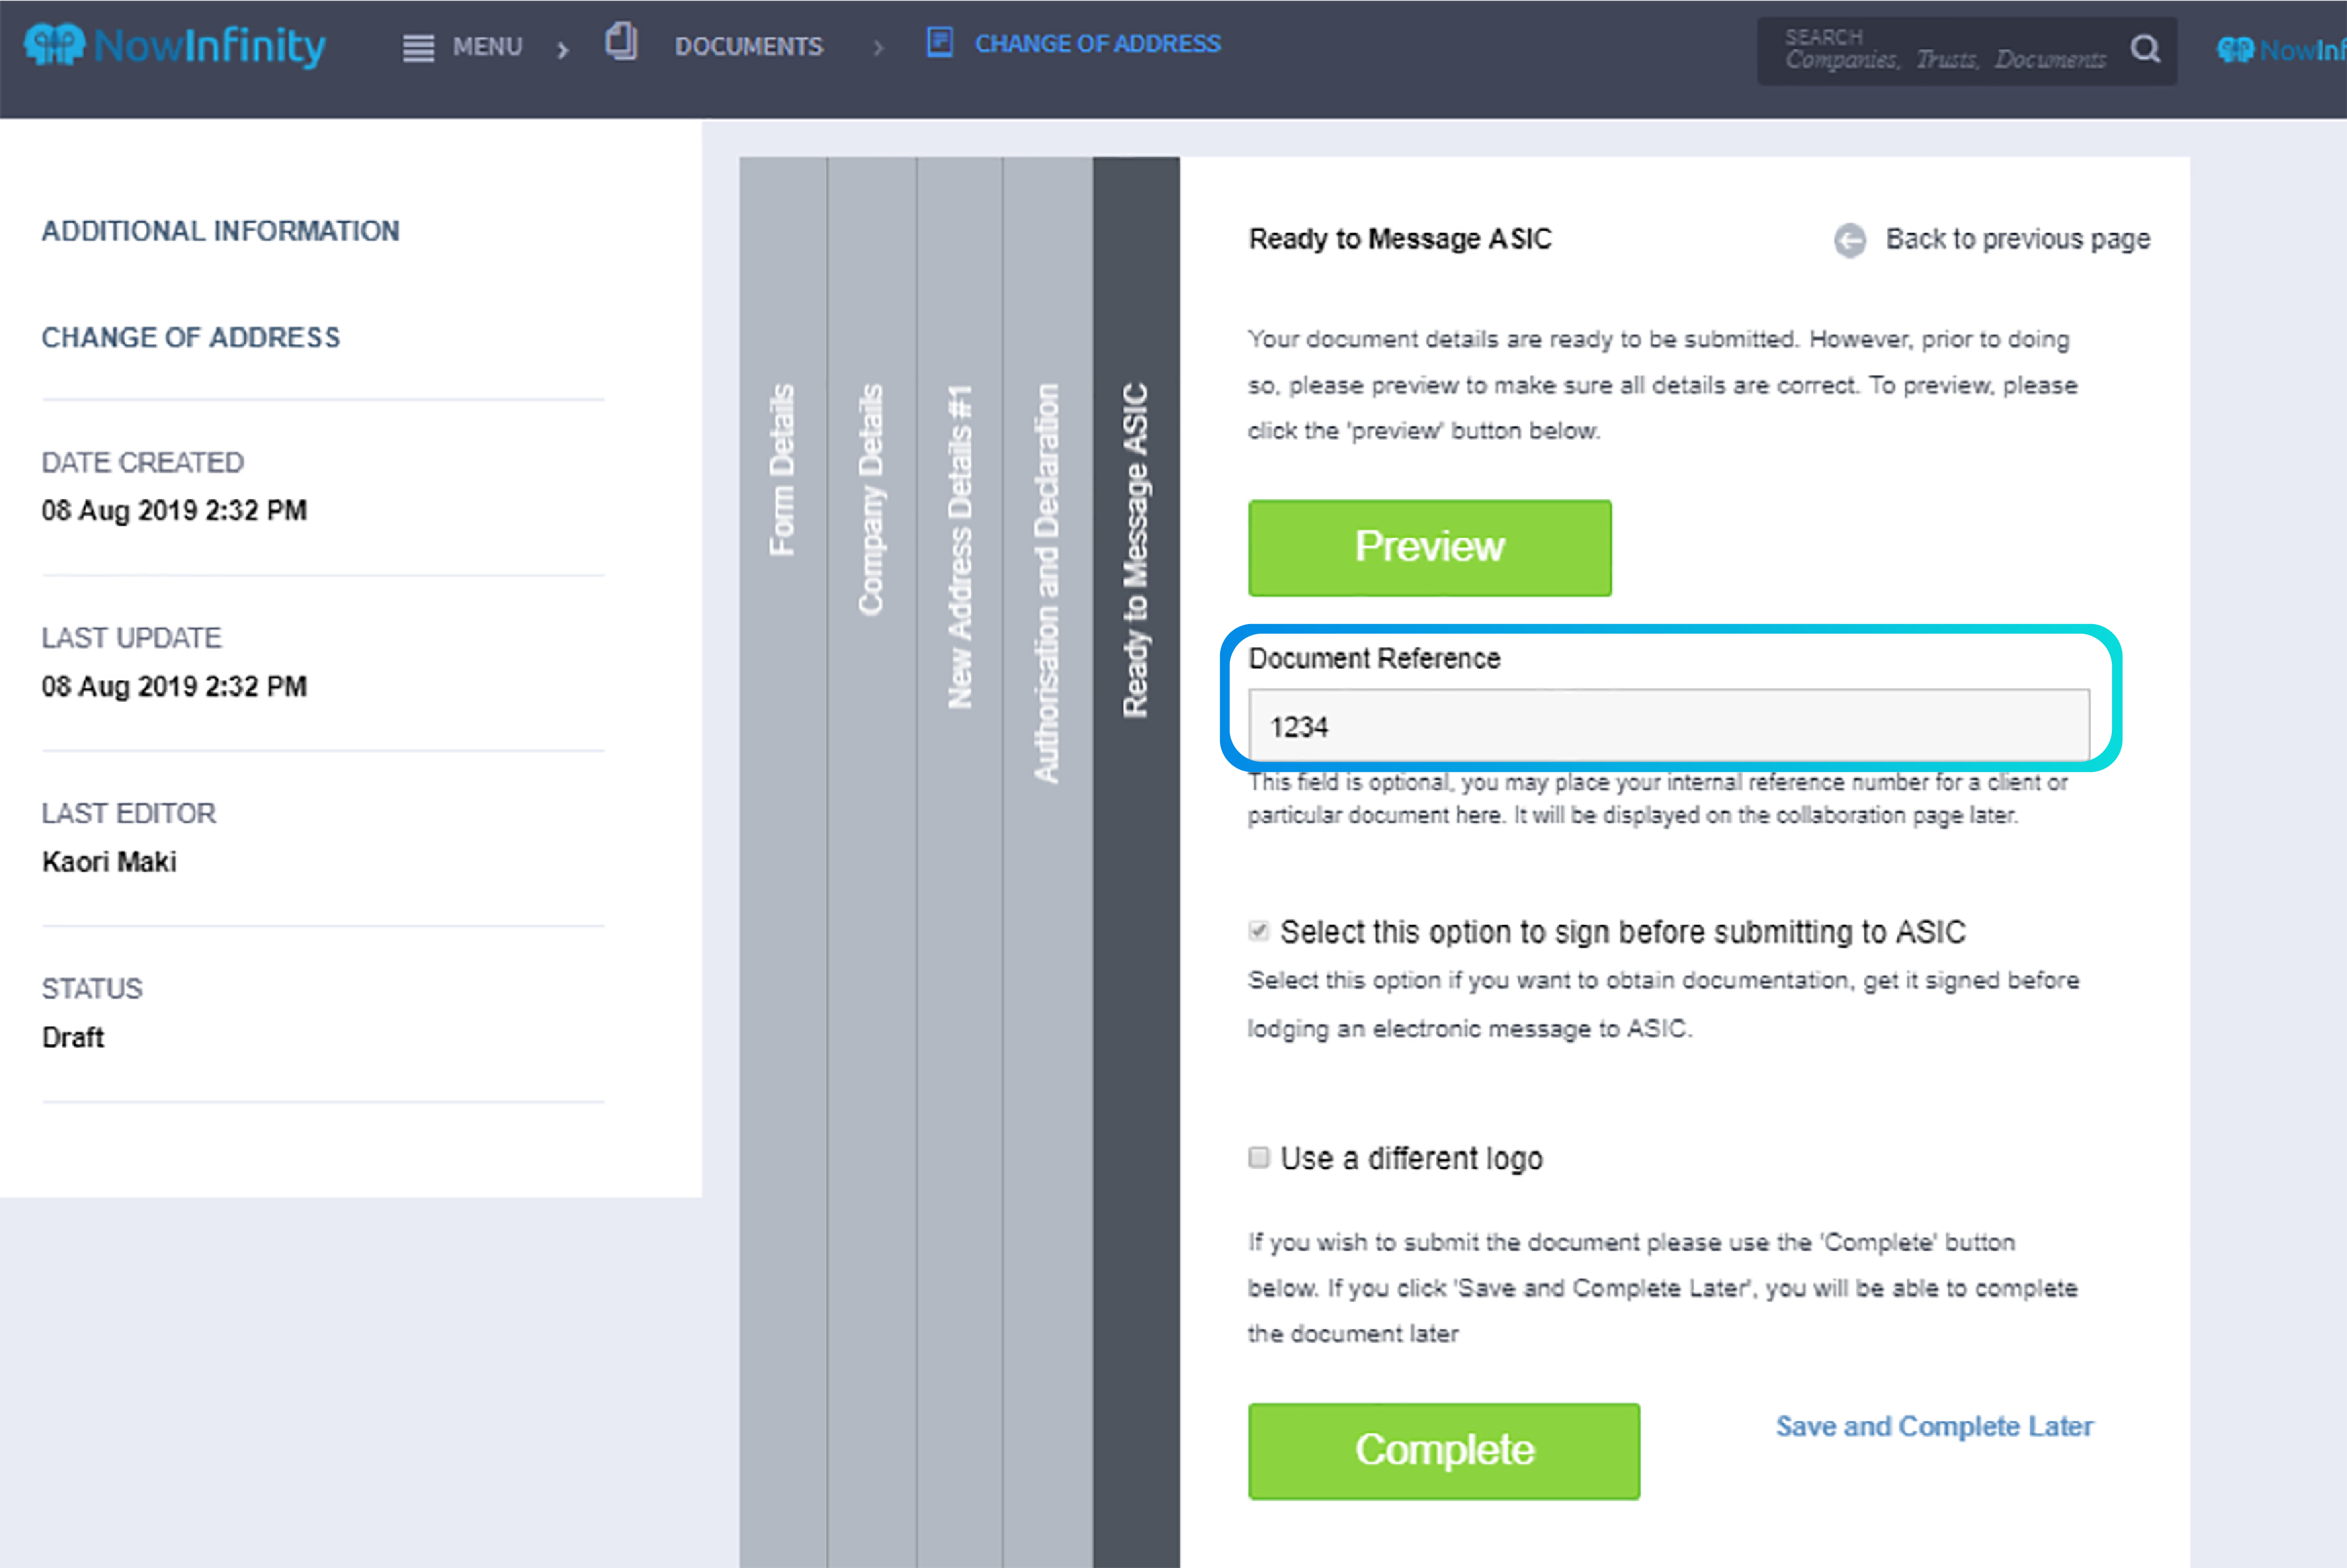
Step 3. When completing an interview form, on the last page, you will see a box for the ‘Document Reference’.
NOTE: Disregard this step if you did not set up your Document Reference code in the ‘Forward Documents’ email template in Step 1.
If the Document Reference is available via the Company Profile or Trust Profile, the box will be prefilled.
If no Company Profile or Trust Profile is associated with the document/lodgement you are completing, the ‘Document Reference’ box will be empty. Ensure a Document Reference (Reference Code) is entered in the box if empty.
NOTE: The symbols “>” and “<” will not be accepted and the Reference will not be saved against any profiles. However, it will be saved against the Collaboration Page (in the Forward Documentation section) once the interview form is completed.
Step 4. Once you have clicked ‘Complete’ on the interview form, you will be redirected to the Collaboration Page.
From the Collaboration Page you may send the document/lodgement via e-signing to the recipient. If you are sending the documents for manual signing, see Step 6.
Step 5. For electronically signed documents: Once the document has been received back e-signed, the NowInfinity system will automatically pull the Document Reference (applied to the interview form) and the document forwarding email address (applied in Document Settings in ASIC Settings) and send an email using the ‘Forward Documents’ email template to the document forwarding email address.
NOTE: If you did not set up your Document Reference code in the ‘Forward Documents’ email template in Step 1, the Document Reference will not be applied.
See Step 6 for manually signed documents.
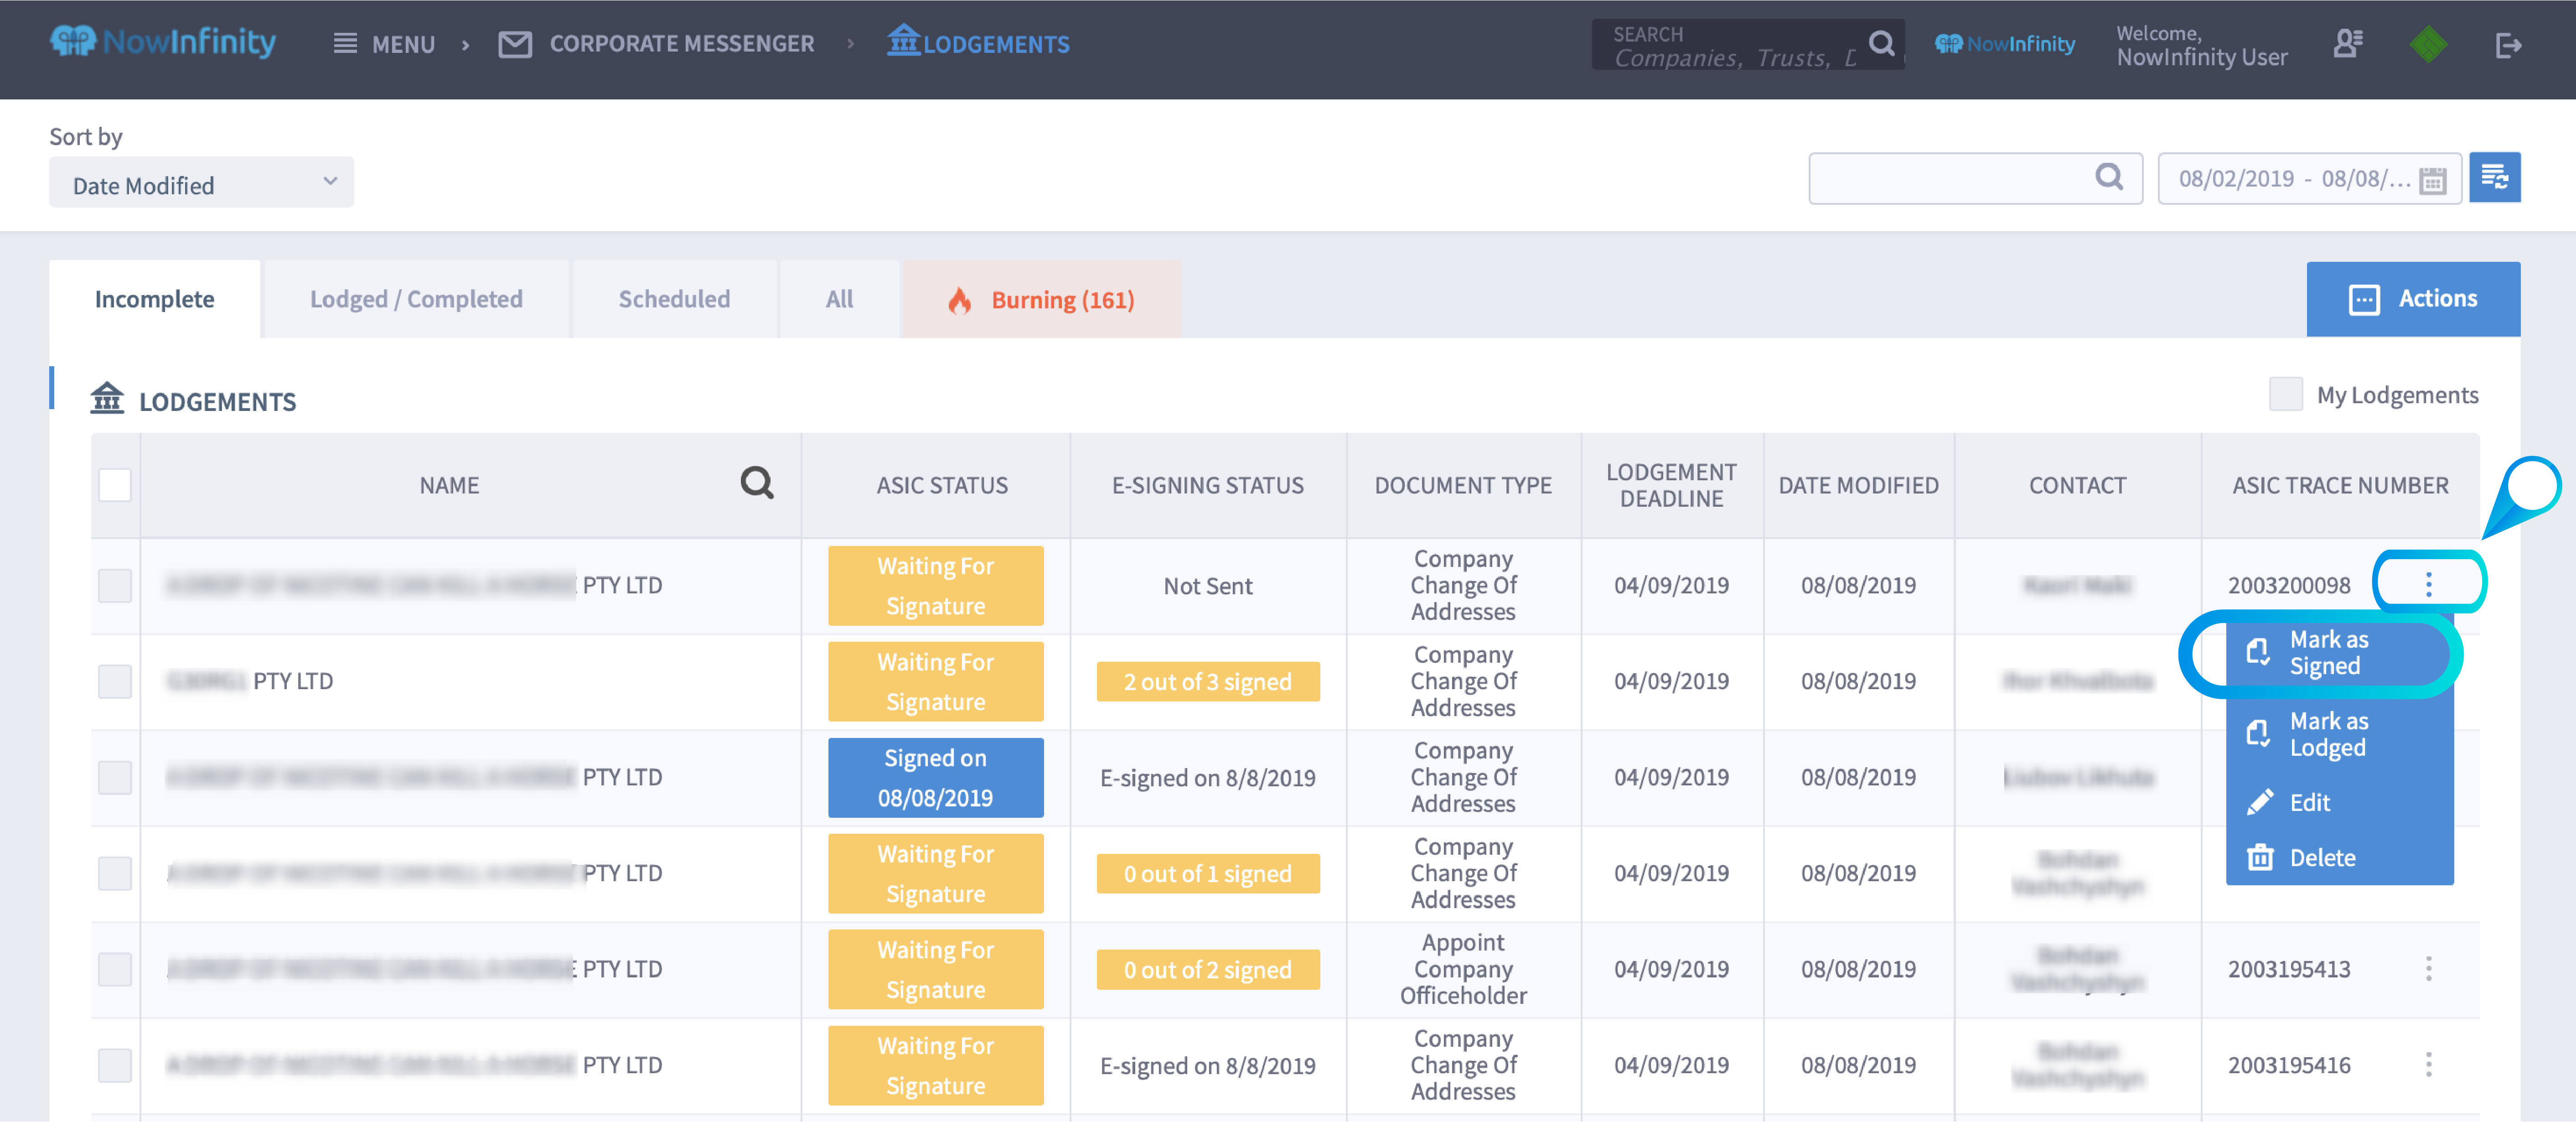
Step 6. For manually signed documents: Once the document has been received back manually signed, go to the document/lodgement and mark it as signed.
To do so, on the right of the row for the document/form, click the three vertical dots and click ‘Mark as signed’.
Upload your signed document and click ‘Confirm Signing Completed’.
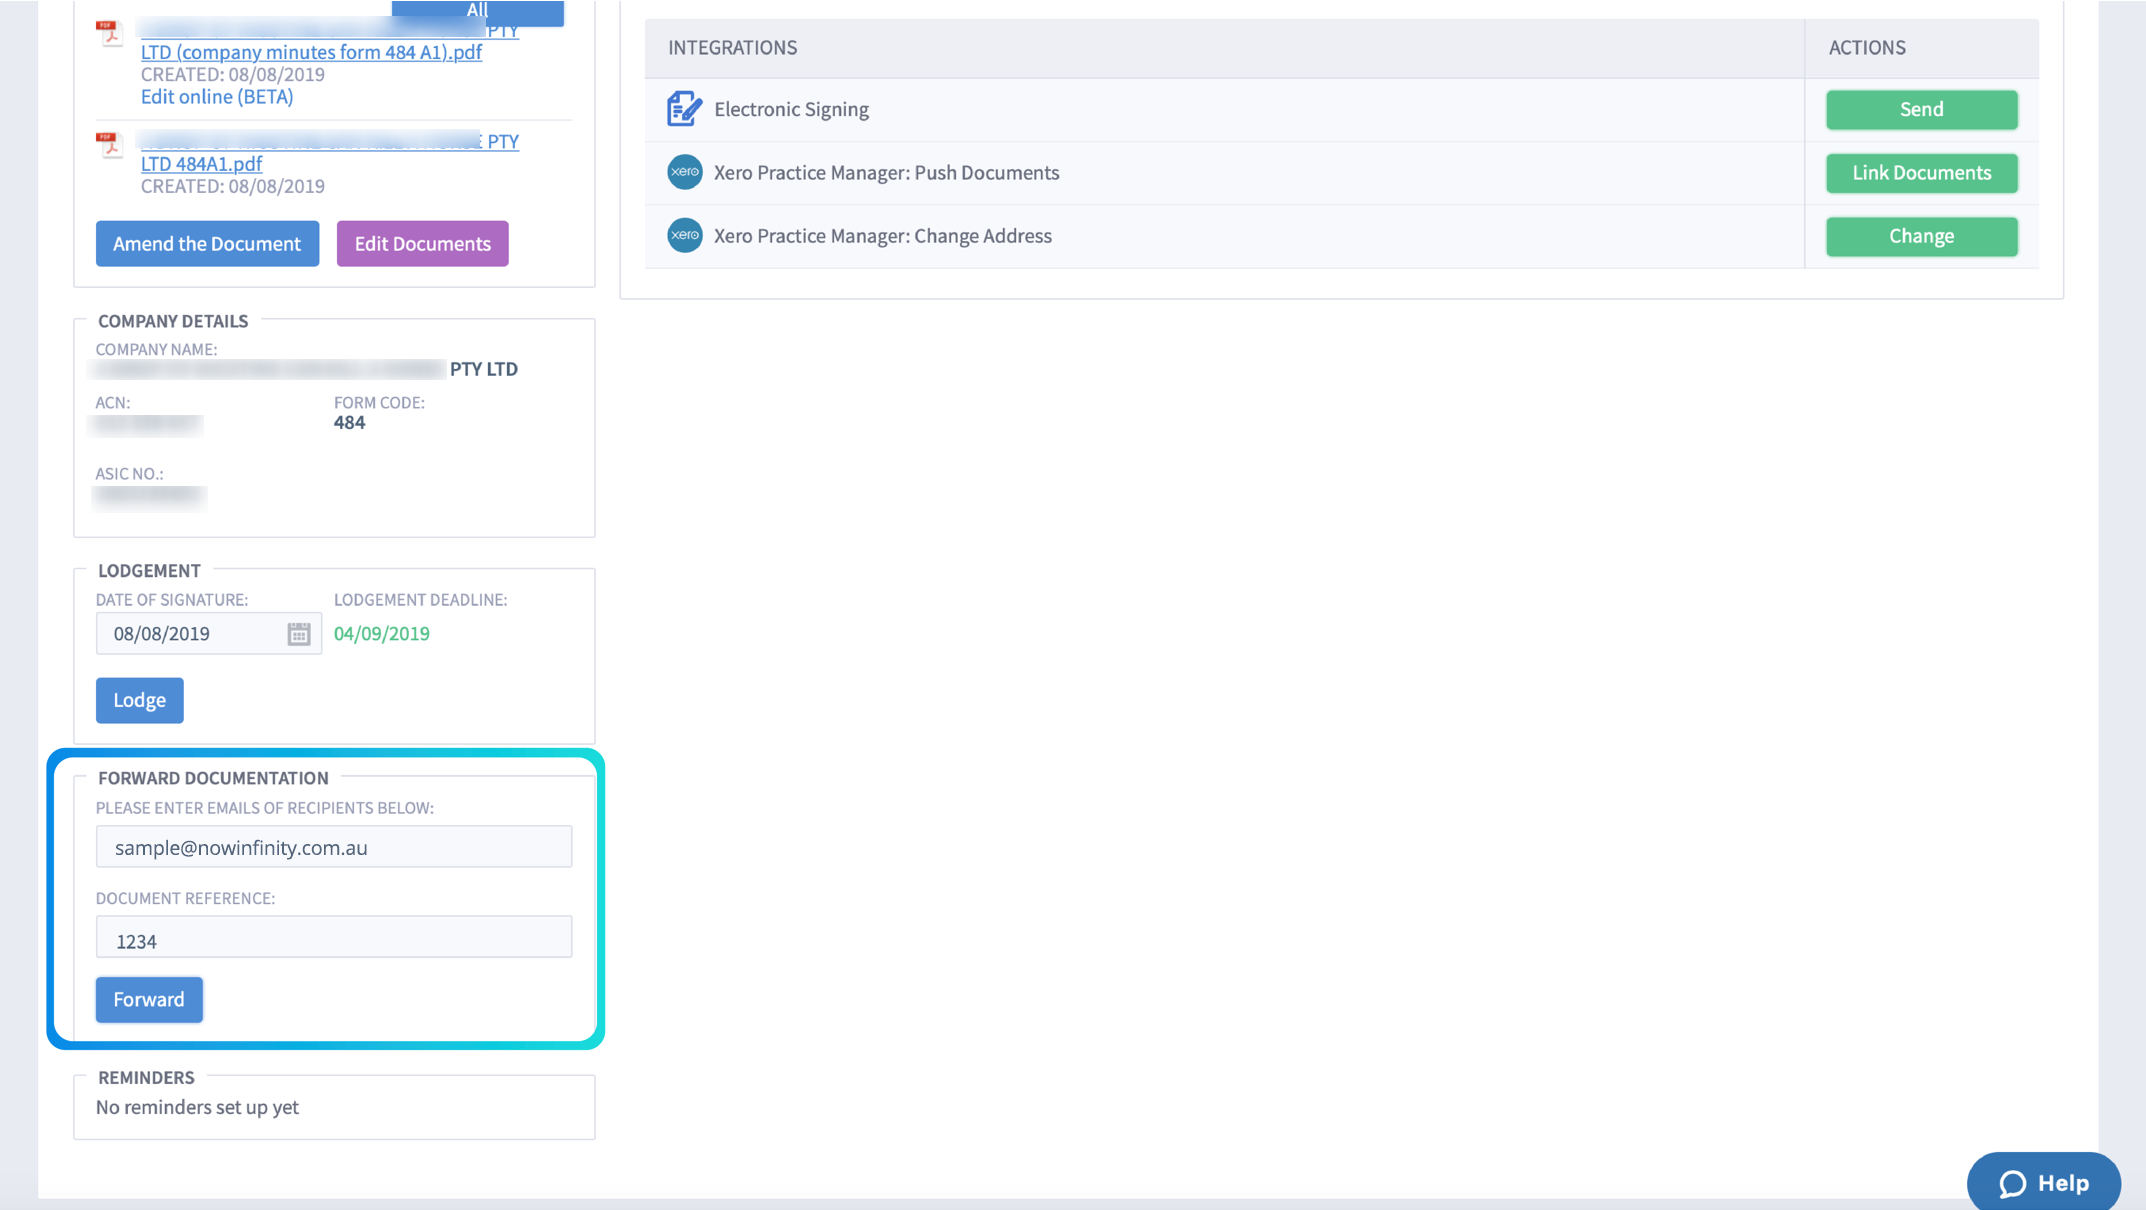
Step 7. Click open the Collaboration Page for the document/lodgement and you will see that the uploaded signed document has been added to the ‘Documents Available’ section.
To forward all documents under ‘Documents Available’ to your forwarding inbox, in the ‘Forward Documentation’ section of the Collaboration page, you will see your document forwarding email address from Document Settings (Product Settings) is prefilled and the Document Reference is prefilled from the interview form.
Click the ‘Forward’ button to email the documents to the document forwarding email address.
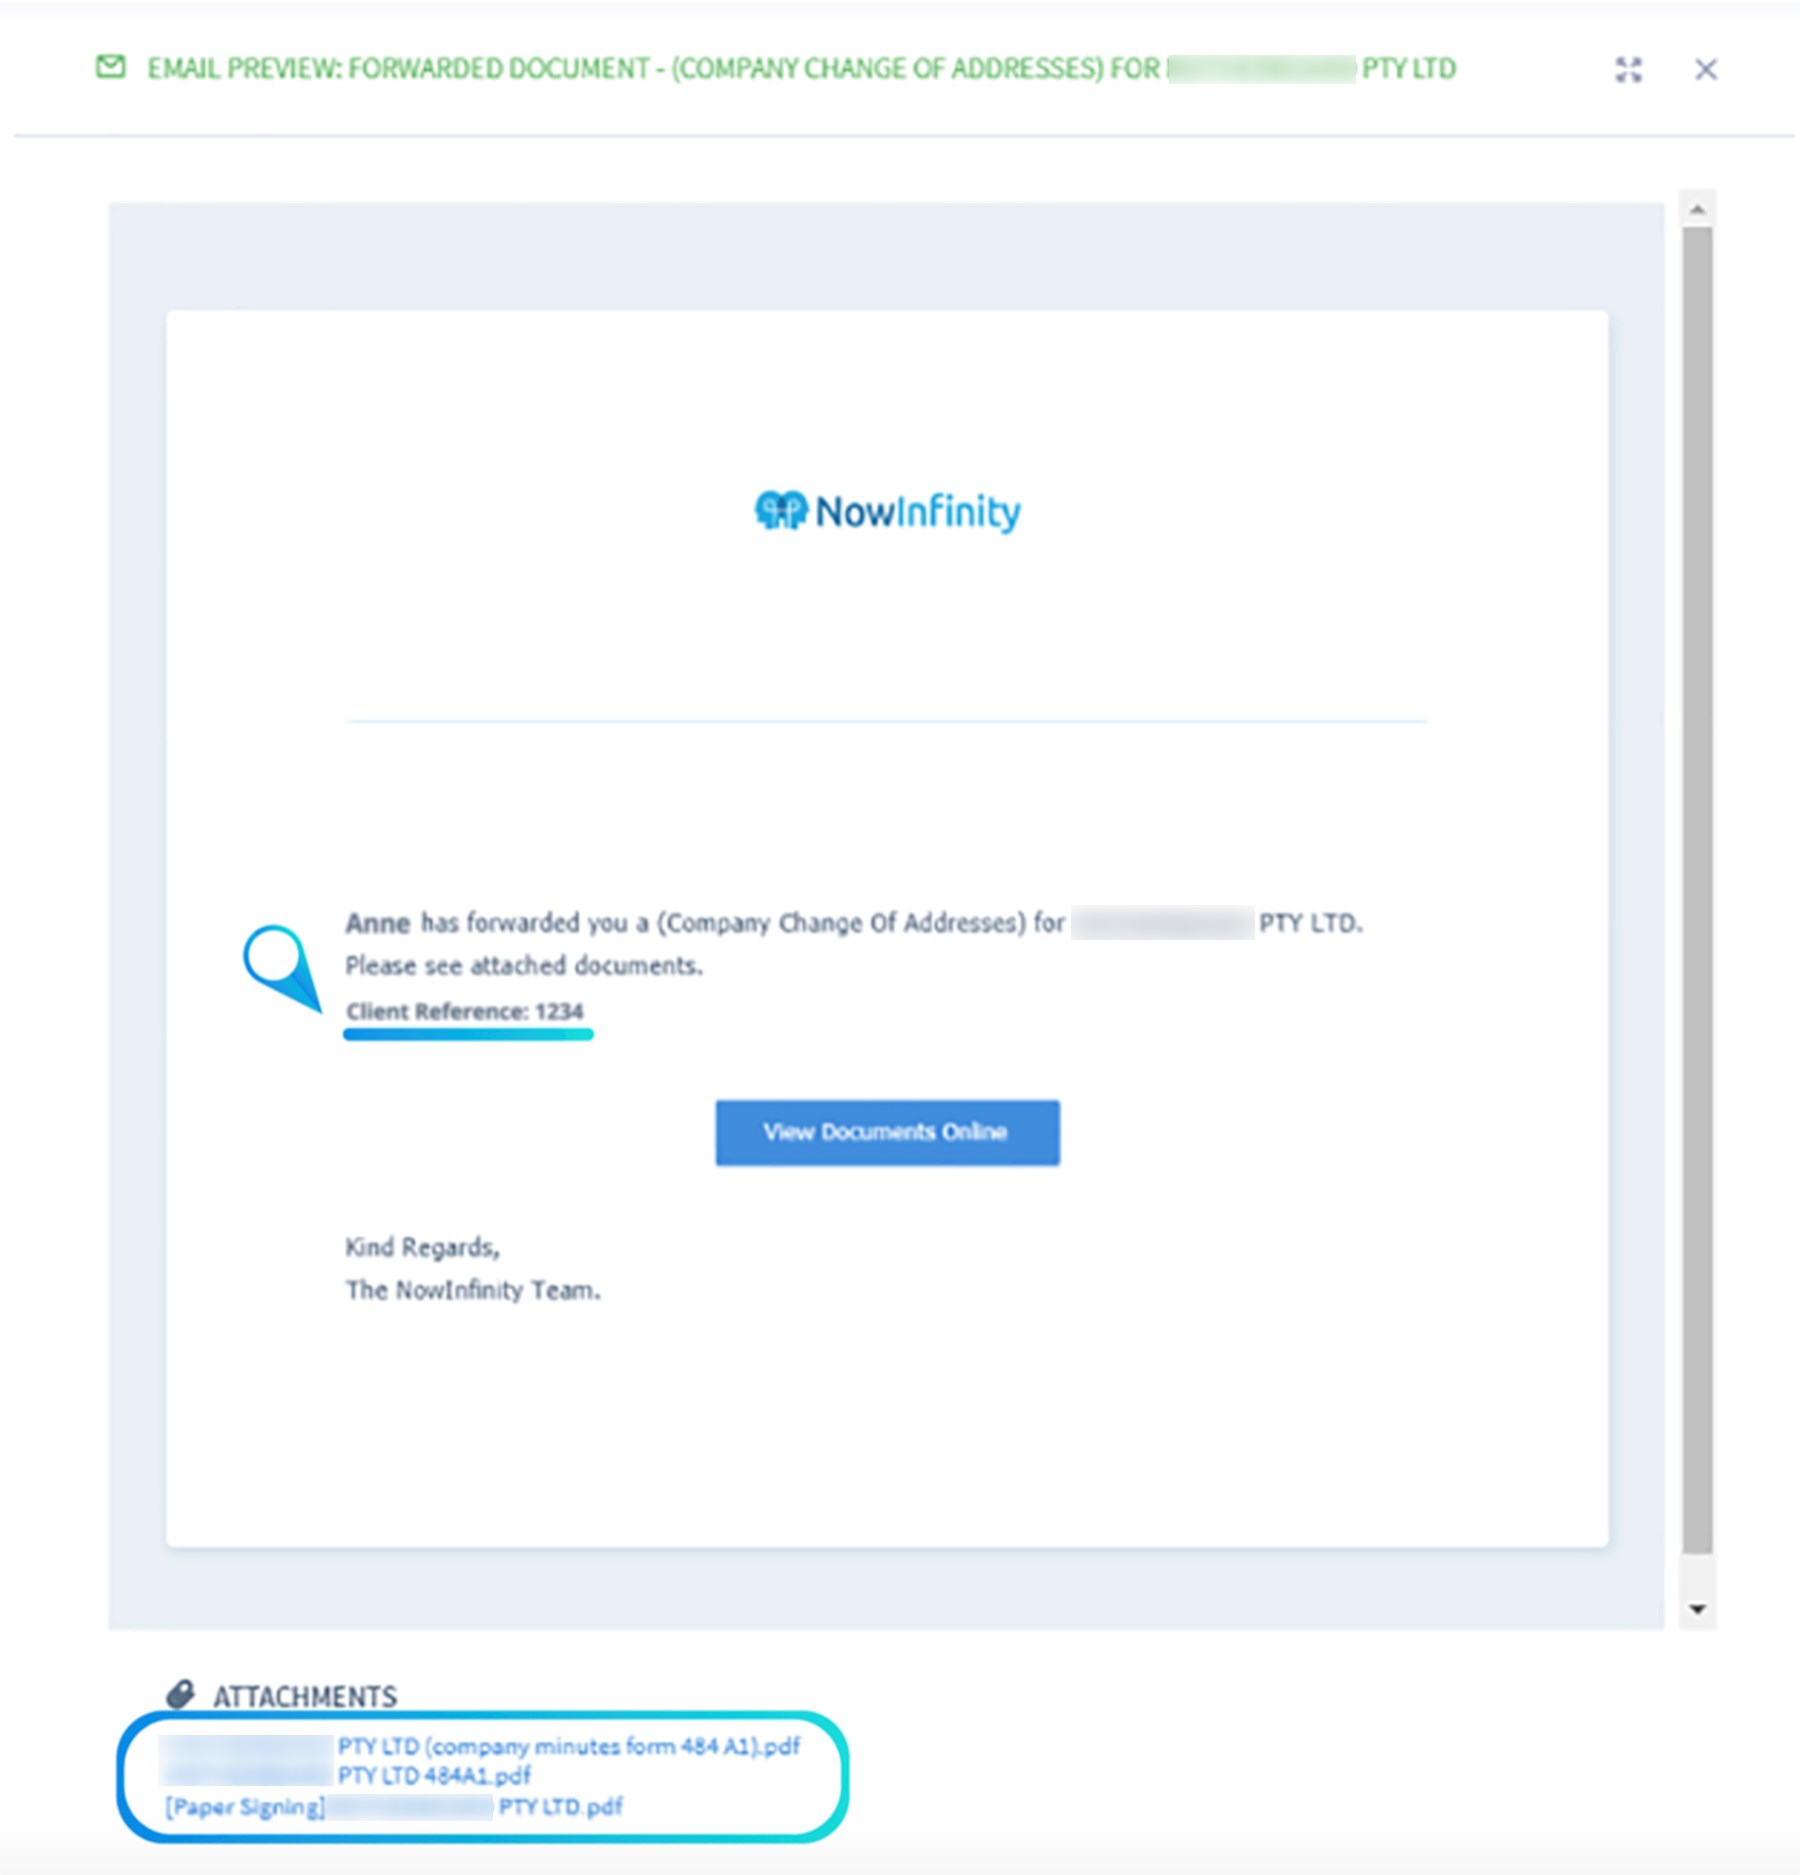
Step 8. The documents under ‘Documents Available’ will be attached to the email template ‘Forward Documents’ and the Document Reference will be applied to the body of the email.
NOTE: If you did not set up your Document Reference code in the ‘Forward Documents’ email template in Step 1, the Document Reference will not be applied.
Step 9. You may check the forwarded documents in Menu > Productivity – Outgoing Correspondence and search ‘Forwarded Document’
Contact our Support Team on 1300 851 057 or email at info@nowinfinity.com.au for more information regarding this feature.